What is Spiffe?
SPIFFE (Secure Production Identity Framework for Everyone) is an open-source specification for securely identifying software systems in dynamic and heterogeneous environments. However, with today’s types of distributed systems (microservices, container orchestration, cloud computing), network-based security practices (IP-based access control) are struggling to manage complexity and scale. To solve this, SPIFFE offers a strong identity framework that enables services to authenticate securely irrespective of their running location.
At its heart, SPIFFE uses short-lived cryptographic identity documents called SPIFFE Verifiable Identity Documents (SVIDs). These identities are distributed via a simple API, and workloads use identities to authenticate to one another, usually by opening a secure TLS connection or signing and verifying JWT tokens.
What is spire?
Spire is simply an implementation of SPIFFE. There are a lot of contributors on the project, and for a niche project it has quite a lot of stars(2k) on github. This was done with Spire, which is a set of Go programs that allow implementation of SPIFFE's "protocol" in our environment. The Spire runs seamlessly in AWS, GCP, Azure, Kubernetes, and even directly in bare-metal installations.
Consider SPIFFE as the driver's license and Spire as the car. There’s a nice SPIFFE implementation comparison on this page.
SPIRE is a graduated project hosted by the Cloud Native Computing Foundation (CNCF).
What is spiffeid?
Spiffeid is an identifier representing the unique identity of a workload within the SPIFFE (Secure Production Identity Framework for Everyone) specification.
It's a universally unique and stable identification of services within environments, regardless of IP addresses or other identifiers that might be flaky or insecure.
Spiffeid consist of the documents as follows:
spiffe://<trust-domain>/<path>
- Trust Domain: A unique identifier for a trust boundary in your system, like an organization or a cloud provider. It ensures that the identity is only valid within a specific context.
- Path: The unique path or service identifier, often reflecting the specific workload or service.
For example, a spiffeid could look like:
spiffe://example.org/service/frontend
This identifies the "frontend" service in the "example.org" trust domain.
The spiffeid is a key component of SPIFFE's identity framework, helping systems authenticate and authorize services securely, ensuring mutual trust across distributed systems.
Zero secrets
Zero Secrets: A security model whereby no sensitive information, such as passwords or API keys, is stored in the system or infrastructure, minimizing the risk of exposure. In contrast, secrets are never stored persistently and instead, identities and credentials are dynamically issued and managed, used only at runtime.
Authentication methods
TLS
The safest method, as the private key is still stored on the sender's side, and the recipient verifies the URI from the TLS certificate URI: spiffe://domain.com/team-a/payments
JWT
A less secure method because someone could intercept the token. It’s important to issue tokens with short expiration times, etc. Also, setting the audience field is crucial, which defines who the intended recipient of the JWT token is. This option is useful when logging into a system that allows authentication only via tokens. The SPIRE project also provides a service like oidc-provider, which allows access to an endpoint with a JWK Set (JWKS), enabling recipients to easily verify JWT tokens.
Example
In this example I will deploy docker-compose services with microservices that will authorize requests between them without using any secrets. Deployment in Kubernetes is much easier, but to fully understand the new tool, it’s best to set everything up locally. For this, Docker Compose is the easiest option. Thanks this solution, you will gain a solid understanding of how it works.
How to setup microservices and authenticate it without secrets?
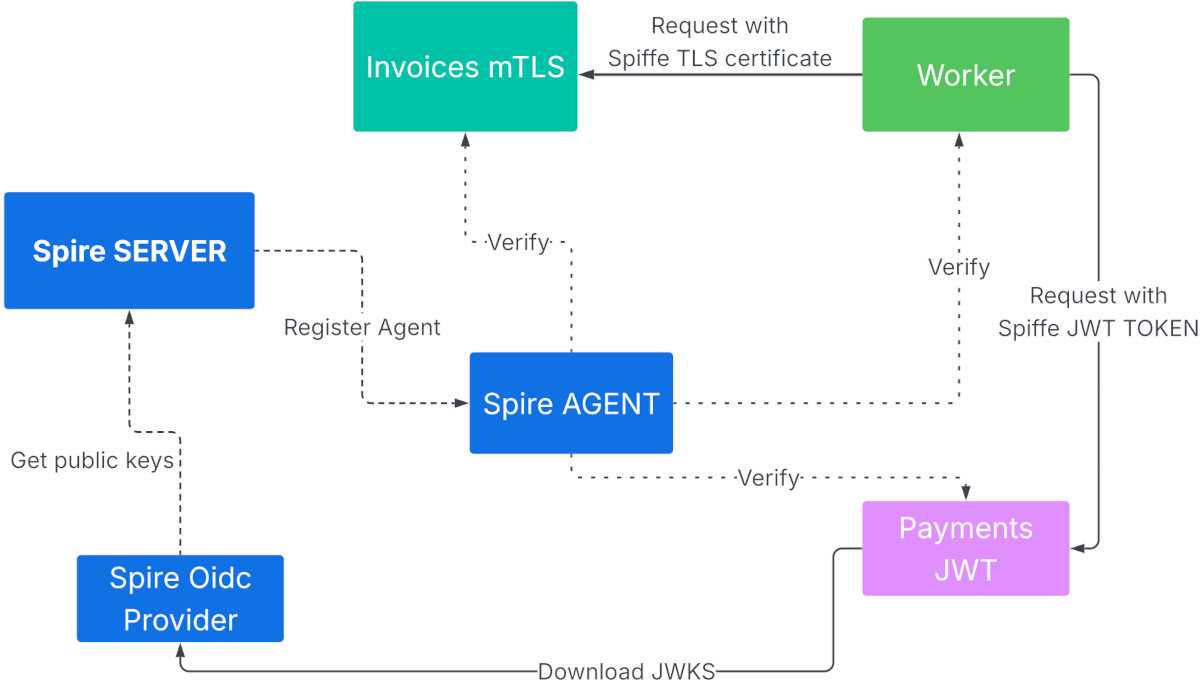
In this example, I will set up 3 microservices:
- Payment JWT
- Invoices TLS
- Worker
The Worker will send a request to Payment-JWT with a JWT token, which will be signed by Spire-Server. Worker will also send a request to Invoices TLS with a TLS certificate signed by Spire-Server. This example demonstrates how SPIFFE/SPIRE is really awesome. We can use both methods.
Additionally, our infrastructure includes 3 more services:
In our infrastructure are additional 4 types of services from spire stack:
- 4. SPIRE Server
-
- SPIRE Agent
-
- SPIRE OIDC Provider
-
- SPIRE sidecar (spiffe-helper)
All microservices use the sidecar spiffe-helper. The program connects to SPIRE via a socket.
This is a client that will allow us to retrieve the TLS or JWT credentials from Spire.
SPIRE can also work as a TCP/IP server, but the socket is preferred for security reasons.
Requirements
- docker version >=28.04
- docker-compose version >=2.29.2
- golang version >=1.22.2
- git
- curl
- make
0/6 Prepare
Clone our repository with examples. This repository has requirements files for this tutorial.
git clone https://github.com/gawsoftpl/gawsoft.com.git
# Go to this blog post example
cd gawsoft/blog/spiffe-spire-tls-jwt-oidc-auth
At the start you have to generate root tls certificates for spire server. For that use small golang code gencerts
from official spire repo which will generate root CA certificates for spire server.
# Build gencerts code and generate tls certificate
make build
# Generate root certificate
make tls
1/6 Spire-Server
In first step run only Spire server
# Start only server for get tls bundle and register agent
docker-compose up -d spire-server
# Get bundle certificate for agent
docker-compose exec spire-server /opt/spire/bin/spire-server bundle show > services/spire-agent/bootstrap.crt
2/6 Spire-Agent
docker-compose up -d spire-agent
# Check agent is healthy
docker exec spire-agent /opt/spire/bin/spire-agent healthcheck -socketPath /opt/spire/sockets/workload_api.sock
# Agent is healthy.
3/6 Add new entry
Add new entry to server thanks that worker microservices
will receive credentials from spiffe with SpiffeID spiffe://example.org/worker
During add new entry you have to set to spire server 3 parameters:
- Who will verify
worker microservice?: Spire agent - Who is adding?"
spiffe://example.org/worker - How to verify
worker microservice?: By docker label=name=worker
# Get tls certificate fingerpint
export CLIENT_A_FINGERPRINT=`openssl x509 -in "services/spire-agent/agent.crt.pem" -outform DER | openssl sha1 -r | awk '{print $1}'`
docker exec spire-server /opt/spire/bin/spire-server entry create \
  -parentID "spiffe://example.org/spire/agent/x509pop/${CLIENT_A_FINGERPRINT}" \
  -spiffeID "spiffe://example.org/worker" \
  -selector "docker:label:org.example.name:worker"
#Entry ID         : (none)
#SPIFFE ID        : spiffe://example.org/worker
#Parent ID        : spiffe://example.org/spire/agent/x509pop/b0c45e51b37fdf1f37dbdc138e2ccbeb12d8785f
#Revision         : 0
#X509-SVID TTL    : default
#JWT-SVID TTL     : default
#Selector         : docker:label:org.example.name:worker
Start worker
# Should generate cert for worker
docker-compose up -d worker
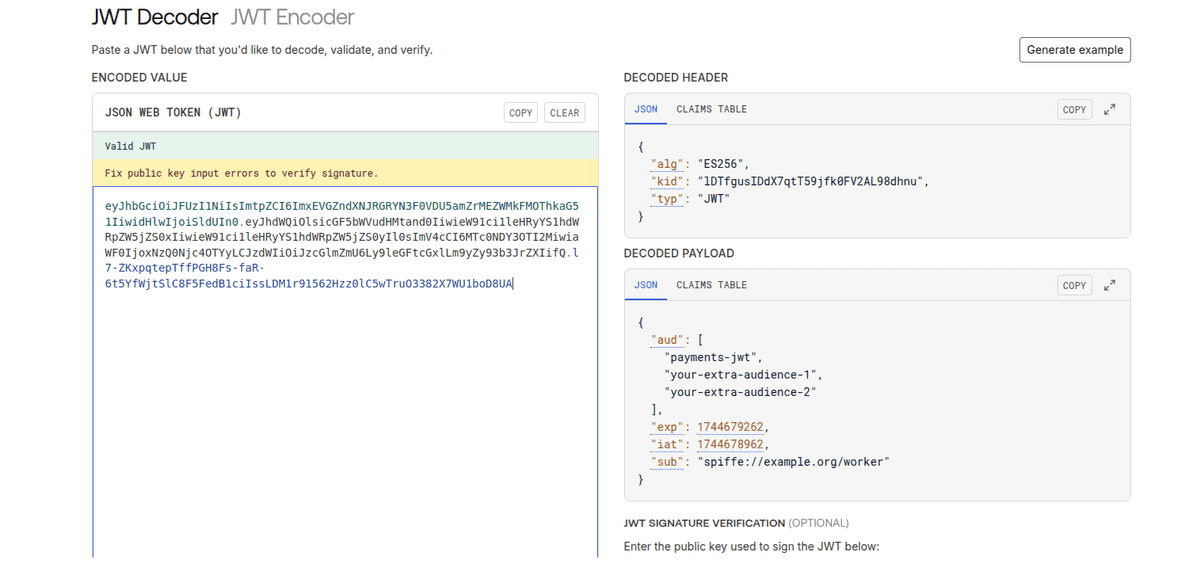
This process will generate jwt token and save in path services/worker/genearted-certs/jwt_svid.token which have data from image
4/6 Add entry for microservice invoice-tls
Invoice tls will start ingress endpoint for receive requests from other microservice
but this service accept only tls certificate from spiffe://example.org/worker. Set parameter
DNS because for ingress you have to have certificate with TLS:SAN
docker exec spire-server /opt/spire/bin/spire-server entry create \
  -parentID "spiffe://example.org/spire/agent/x509pop/${CLIENT_A_FINGERPRINT}" \
  -spiffeID "spiffe://example.org/invoices-tls" \
  -dns "invoices-tls.example.org" \
  -selector "docker:label:org.example.name:invoices-tls"
#Entry ID         : 6928094a-931f-42be-b104-36ed68400c87
#SPIFFE ID        : spiffe://example.org/invoices-tls
#Parent ID        : spiffe://example.org/spire/agent/x509pop/b0c45e51b37fdf1f37dbdc138e2ccbeb12d8785f
#Revision         : 0
#X509-SVID TTL    : default
#JWT-SVID TTL     : default
#Selector         : docker:label:org.example.name:invoices-tls
#DNS name         : invoices-tls.example.org
Verify added entries
docker exec -it spire-server /opt/spire/bin/spire-server entry show
You should see 2 entries as response
#Found 2 entries
#Entry ID         : a536a251-a469-4f51-9713-a886415976a8
#SPIFFE ID        : spiffe://example.org/invoices-tls
#Parent ID        : spiffe://example.org/spire/agent/x509pop/b0c45e51b37fdf1f37dbdc138e2ccbeb12d8785f
#Revision         : 0
#X509-SVID TTL    : default
#JWT-SVID TTL     : default
#Selector         : docker:label:org.example.name:invoices-tls
#DNS name         : invoices-tls.example.org
#
#Entry ID         : c64e8351-e033-41a6-be8e-37529787cc7b
#SPIFFE ID        : spiffe://example.org/worker
#Parent ID        : spiffe://example.org/spire/agent/x509pop/b0c45e51b37fdf1f37dbdc138e2ccbeb12d8785f
#Revision         : 0
#X509-SVID TTL    : default
#JWT-SVID TTL     : default
#Selector         : docker:label:org.example.name:worker
Start invoice microservice.
# Start invoice microservices with sidecar
docker-compose up -d invoices-tls-sidecar invoices-tls
Verify that tls works, for test use tls from worker microservice
curl --resolve invoices-tls.example.org:443:127.0.0.1 --cacert services/worker/generated-certs/ca.pem --key services/worker/generated-certs/tls.key --cert services/worker/generated-certs/tls.crt https://invoices-tls.example.org
If you see response as below tls works!
# Access granted. Client certificate is valid.
If you see text: Access granted client certificate is valid and curl return code 200, server validate worker tls certificate as spiffie://example.org/worker everything's works fine.
6/6 Verify jwt token in payments-jwt via OIDC spiffe provider
Spire can work as Oidc provider thanks that you can validate jwt token.
We have to add entry to spire-server thanks that oidc service will have access to get jwt token. For test, I set up Oidc provider without tls encryption. In a production you can't do that. You have to start this with tls.
# Add oidc entry for received credentials
docker exec spire-server /opt/spire/bin/spire-server entry create \
  -parentID "spiffe://example.org/spire/agent/x509pop/${CLIENT_A_FINGERPRINT}" \
  -spiffeID "spiffe://example.org/oidc-discovery-provider" \
  -hint "oidc-discovery-provider" \
  -selector "docker:label:org.example.name:oidc-discovery-provider"
Start oidc provider with his sidecar
# Start oidc
docker-compose up -d oidc-discovery-provider-sidecar oidc-discovery-provider
Verify that openid-configuration works. Request should return openid configuration as response.
curl -H "Host: oidc-discovery.example.org" localhost:8080/.well-known/openid-configuration
#{
#  "issuer": "http://oidc-discovery.example.org",
#  "jwks_uri": "http://oidc-discovery.example.org/keys",
#  "authorization_endpoint": "",
#  "response_types_supported": [
#    "id_token"
#  ],
#  "subject_types_supported": [],
#  "id_token_signing_alg_values_supported": [
#    "RS256",
#    "ES256",
#    "ES384"
#  ]
#}
Check jwtks endpoint works
curl -H "Host: oidc-discovery.example.org" localhost:8080/keys
#{
#  "keys": [
#    {
#      "kty": "EC",
#      "kid": "R1hKd28Lu5VghYwWjehtNLVGE7F7LzeW",
#      "crv": "P-256",
#      "alg": "ES256",
#      "x": "0lC6D4BdMB8XTq5KDRMkSZX495HM5hh8eWeqvBC_OPM",
#      "y": "47_dZIkTxUjzjXdYl7rAIA7qBKPme9Mr1v-u7U6UhN0"
#    }
#  ]
#}
And in the grand final, verify that the JWT token signed by SPIFFE belongs
to the worker microservice and works in the Payments-JWT microservice.
This microservice has the configuration information for the JWKS keys,
the required aud JWT field, and checks the sub of the request, which
in this situation will be spiffe://example.org/worker.
You can see in file docker-compose.yaml ENV variables which I set
for payment-jwt service
JWKS_URI: http://oidc-discovery-provider:8080/keys
# Require JWT_AUDIENCE
JWT_AUDIENCE: payments-jwt
# Allow only this subject
JWT_SUB: spiffe://example.org/worker
Start payments-jwt microservice
docker-compose up -d payments-jwt
Send request to payments-jwt token as worker identity
# Start payments jwt microservices
token=`cat services/worker/generated-certs/jwt_svid.token`
curl -H "Authorization: Bearer $token" http://localhost:3000
# Response:
#🎉 Token is valid!
#
#Claims:
#sub: spiffe://example.org/worker
#aud: [payments-jwt your-extra-audience-1 your-extra-audience-2]
#exp: 1.744679262e+09
#iat: 1.744678962e+09
Cleanup
# This command remove all tls certificated, token etc you can start from begining.
make clean
Summary
Everything works as expected. Thanks to Spire, we can authenticate multiple machine-to-machine services without storing secrets in our system. All certificates and JWT tokens are temporary and should not be stored on disk; they can only be stored during the operation of our program.
